VIM shortcuts

Basic navigation


h j k l - LEFT DOWN UP RIGHT
2h - 2 steps LEFT
H - home (top screen)
10j - 10 steps DOWN
J - join this line to the line below
{ - UP a section 
} - DOWN a section
o O - open line BELOW open line ABOVE
b - beginning of current word
w - beginning of next word
e - end of current word
$ - end of line 
^ - start of line
H - TOP of screen
L - BOTTOM of screen
v - select text
V - select line
v3j - select 3 lines DOWN

Modifying text


i - insert
a - append
dh - DELETE left
dl - DELETE right
dd - DELETE line
dw - delete word
D - DELETE to end of line
x - DEL
X - BACKSPACE - INDENT line LEFT (use visual for block) 
>> - INDENT line RIGHT  (use visual for block)
p - paste after
P - paste before
3p - paste 3 copies
yy - yank whole line
yw - yank word
y$ - yank to end of line
4yy - yank four lines
Y - yank whole line
J - join current line to next

Save Exit and help


K - HELP (bash, req select word)
ZZ- save and quit
ZQ - quite without saving
z - save

SPECIAL


[ - enter command mode
, - leader key
v - visual
: - enter command mode
i - insert mode
a - append mode
:tabnew - open new tab
,n - left tab
,m - right tab
/ - search # press enter, then n to repeat, N repeat up 
:s/old/new/g - globally change

Additional/Plugins


F2 - paste code blocks from external (press again to end)
n - remove highlight last search
,e - quit
,E - qa! quit all windows
ctl j - move to lower window
ctl k - move to upper window
ctl h - move to left window etc
,s - sort selected
f - fold code block (again to undo)
F - fold all (again to undo)
ctl space - auto complete
shift p - filesearch

Git


:Gstatus - status / stage by "-"
:Gcommit - message 'wq' save
:Gmerge

Cool combinations


cH, dH - copy/delete to top of screen
d3+ - delete line + 2 lines below
y3+ - copy lien + 2 lines below
d/test - delete all words 'test'

Insert breakpoint and ipdb PDB bit…

Advertisement

Setting up VIM as a python IDE

If you are looking for a lightweight but feature rich editor you can’t go past VIM! Sure those keyboard shortcuts are difficult remember and it’s frustratingly hard trying to stop reaching for that bloody mouse (the mouse will actually work in this set-up BTW). However, what I have found is the best way to learn VIM (I don’t think you ever really learn vim) is to make it useful enough that you want to start using it; this helps build up the muscle memory required to become efficient [enough]. The ultimate payback is that with practise you can become really really efficient relative to a user stuck with a mouse and complex GUI. The mouse is so 1980’s anyway 😛

vim_terminal_example1

So this post is about making VIM useful! The steps are based around Ubuntu/Debian Linux but should be adaptable for OSX and other NIX distros. Windows users, like yourselves I have no idea (-;?

Of course nothing I ever do is original and this especially goes for this post which borrows heavily from an excellent (but old) PyCon Asia talk by Martin Brochhaus. The .vimrc and much of the instructions are taken from the talk so feel free to watch it on youtube. I’ve also tried to update some of the info and stick to the minimum to get you coding away ASAP.

Section 1: Basic VIM install

These steps will clone the current version of VIM from source and enable additional features. If you already have a copy installed (ie vim starts when you type ‘vim’) I would first fun ‘apt-get remove vim’ (or your equivalent). First dependencies and some tools.

sudo apt-get update
sudo apt-get install mercurial curl python-pip flake8
sudo apt-get build-dep vim

#install python packages
sudo pip install ipdb
sudo pip install jedi
sudo pip install flake8

As we are going to use a bin folder in our home directory we need to put this location into our path so that our new version of vim will run from the command line.

#add a home bin dir to your path
nano ~/.bashrc

#add the following to the end of the file
if [ -d $HOME/bin ]; then
PATH=$PATH:$HOME/bin
fi

#save and exit

Now we make the ~/bin dir as well as an ~/opt for the vim install. Eventually we will use a simlink from ~/bin (now in our path) to the ~/opt folders in our home directory, the -p flag says ‘don’t complain if this dir is already there’. The final command reloads your bashrc without you having logout. Cool.

mkdir -p ~/bin
mkdir -p ~/opt
source ~/.bashrc

Now to install VIM.

cd ~/Desktop
hg clone https://vim.googlecode.com/hg/ vim
cd vim/src
./configure --enable-pythoninterp --with-features=huge --prefix=$HOME/opt/vim
make
make install
cd ~/bin
ln -s ~/opt/vim/bin/vim

#the following should return /home/YOUR_USERNAME/bin/vim
which vim

Great!

Section 2: The vimrc settings file

Now we need a “.vimrc file”. This file will contain our customisations (the dot says I’m a hidden file). You can get mine from here (download to your desktop or copy contents into a blank txt file). It is worth look at this file in a text editor as it contains some information on the key short-cuts and the plugins we are going to use (BTW in .vimrc files a single quote ” indicates a comment (aka #) a double quote “” indicates a bit of code that can be uncommented to enable something). The next bit of code simply copies the file to your home dir and the gets a custom colour scheme (mostly just to show how to do it).

mv ~/Desktop/vimrc.txt ~/.vimrc
mkdir -p ~/.vim/colors
cd ~/.vim/colors
wget -O wombat256mod.vim http://www.vim.org/scripts/download_script.php?src_id=13400

Section 3: Getting set-up for the plugins with pathogen

This next part is important. To manage plugins we will use a bit of kit called pathogen. The plugins can then be installed (mostly by a git clone) right into the “~/.vim/bundle/” (this will result in a folder structure like this: .vim/bundle/plugin-name) and pathogen will handle everything for us – awesome! Most plugin developers set-up their folders to work nicely with pathogen to make life easy.

mkdir -p ~/.vim/autoload ~/.vim/bundle
curl -so ~/.vim/autoload/pathogen.vim https://raw.githubusercontent.com/tpope/vim-pathogen/master/autoload/pathogen.vim

Section 4: Installing plugins

The first plugin we will use is called powerline and it adds features and makes a better looking status line.

#install powerline plugin
cd ~/.vim/bundle
git clone git://github.com/Lokaltog/vim-powerline.git

The next plugin allows code folding to make it easier to look through long blocks of code. Its simple to use, just type f to collapse a section of code of F to collapse it all. Type again to reverse the folding – sweet as.

# install folding flugin us f to fold block of F to fold all
mkdir -p ~/.vim/ftplugin
wget -O ~/.vim/ftplugin/python_editing.vim http://www.vim.org/scripts/download_script.php?src_id=5492

The next one installs ctrlp which allows nice fuzzy file searches from directly inside vim.

#install ctrlp
cd ~/.vim/bundle
git clone https://github.com/kien/ctrlp.vim.git

Install the jedi plugin which allows awesome auto-completion of commands and imports using [ctl][space].

#install jedi plugin
git clone --recursive https://github.com/davidhalter/jedi-vim.git

Install syntastic is another awesome plugin that does syntax checking and will check your code for compliance with PEP8.

#install syntastic
git clone https://github.com/scrooloose/syntastic.git

Forget tabbing into the terminal to stage/commit/merge etc just install git support with fugitive.

# install git support
cd ~/.vim/bundle
git clone git://github.com/tpope/vim-fugitive.git
vim -u NONE -c "helptags vim-fugitive/doc" -c q

So that is it! Your editor should look something like this:

vim_terminal_example2

Well that’s the install. Next post will be the shortcuts I use all the time and some that I want to learn as a bookmark for myself. Otherwise checkout the links to the plugins for detailed descriptions of what they do. But now you should be up and running with a pretty nice looking IDE!

Install Arch Linux on virtualbox – the nuts and bolts (pt2)

**This continues on from the previous post that can be found here**

Now that we have our base system installed, its time to add some tools that will give us a nice GUI desktop. But first off we will setup sudo so we can stop being root. First we’ll create a user. This first command creates a home directory called “dwheeler” using the -m flag, adds this user to the administrator group (wheel) with the -G flag and links us to bash. Enter a password after the passwd command. Obviously substitute for your username and password.

useradd -m -G wheel -s /bin/bash dwheeler
passwd dwheeler

Next we setup sudo. Sudo has a special editor to change it called “visudo”, we should always use this modify the config file. After typing the visudo command scroll down to the line that contains “root ALL=(ALL) ALL”, and underneath that add your username and the “ALL=(ALL) ALL” part. Note that visudo uses VI, which can be a little tricky to use for the uninitiated. Once you are at the line you want to insert your username, type “i” to insert, once you have finished type [esc] and then colon “:” and [wq] to save and exit (ie “:wq”).

root  ALL=(ALL) ALL
dwheeler  ALL=(ALL) ALL

Type “reboot” and now login as yourself. Now to install some graphics tools.

sudo pacman -S xorg-server xorg-xinit xorg-server-utils mesa
sudo pacman -S xorg-twm xorg-xclock xterm

Because we are using virtualbox, we need to install some helper tools that will allow the graphics to work properly. I got some good ideas from this post (http://wideaperture.net/blog/?p=3851), it might be worth checking it out for a second way of doing this.

sudo pacman -S virtualbox-guest-utils
sudo nano /etc/modules-load.d/virtualbox.conf

After nano opens, add these to these lines to the virtualbox.conf file:

vboxguest
vboxsf
vboxvideo

Then get this too load.

sudo systemctl enable vboxservice.service

Reboot using “sudo reboot”, once you are back into the environment type “startx”, and some very basic windows should open confirming that x is working! Type exit in these windows to return to the terminal.

vm21

Finally, we will install the desktop environment. This consists of two parts, first the display manager that will log us in and kick off the desktop, and then the desktop environment itself. You can choose from a bunch of different environments, from fancy feature rich to bare-bones, see the arch desktop page for the options. I’m all for saving resources so I’m installing the lightweight LXDE. Installing the lxde group using pacman also installs the display manager (called lxdm).

pacman -S lxde

Accept the defaults. Now we need to get the display manager to load automatically at boot, and set the default desktop (note you can install multiple desktops environments lxdm will give you options to boot into them instead of the default if you should wish)

sudo systemctl enable lxdm
nano /etc/lxdm/lxdm.conf

In nano uncomment the desktop environment you want to be the default, in my case it was this line ”
session=/usr/bin/startlxde”

Reboot, login, and bobs your uncle!

Note: If full screen doesn’t work, try typing “sudo depmod -a” in a terminal and then reboot again

vm22

Last job is just to change the permissions on the shared folder so that we can access the host (replace username with your username).

sudo usermod -a -G vboxsf username


Install Arch Linux on virtualbox – the nuts and bolts (pt1)

Featured

Installing Arch is incredibly satisfying (maybe thats code for frustrating) as it really does introduce you to the flexibility offered by the modular nature of Linux. And with virtualisation software like virtualbox, we don’t have to worry about turning our computer into a fancy doorstop while we madly google a solution to that frozen black screen.

With the excellent Arch beginners guide installation wiki things really are not that difficult, however, there certainly are some got-yas (hair pulling), especially when installing inside a VM. Hopefully this step by step guide will help someone out.

Step 1. Download the latest Arch ISO, remember to use a torrent to save the arch servers bandwidth (and its a good FU to the MPAA).

Step 2. While you’re waiting, lets setup the VM. Open up virtualbox and click on ‘new’.

Capture

Typing Arch into the name box should populate the other options.

vm1

Set the memory to something sensible (1gb), remember you need to save some for the host, so stay away from the red section of the sliding bar.

Capture3

We want to create a virtual hard drive now (the 8gb default is probably a little too frugal).

Capture4

Select the top option on the next screen (VDI) then allow it to be dynamically allocated. Even though the drive will dynamically allocate space, we need to set the maximum size, at 8gb (the default on my machine) we will probably run out of space pretty quickly in real world desktop use. So lets make it something sensible. An alternative would be to do a minimum base install and then hook-up a shared folder to the host and keep data there (more on that latter).

vm2

Press “Create” and now we can setup the options on our new virtual machine. On the [general][advanced] tab setup bi-directional clipboard and file sharing.

vm3


vm4


Also tick the “show top of screen” or you’ll get driven crazy by the dropup menu destroying your life! On the system setting change the processors to suite your system. Display setting, might as well enable 3D. Now for the storage settings we can virtually stick our downloaded ISO into a imaginary CD-drive.

vm5

Click the ‘add CD’ button and point the file option to your freshly downloaded Arch ISO. The will allow the VM to boot from the ISO rather than; well nothing! Finally, lets setup a shared folder with the host. Select the folder path and click the auto-mount check box.

vm7

Now we are ready. Click “start” and we should get a boot screen, press enter (boot into Arch) and after a few seconds we should have a flashing cursor.

vm7 vm8 vm9

Bingo! Now I’m pretty much following along with the beginners guide.

Step 3 – Terminal action!

Firstly, I’m assuming you are using a standard keyboard layout (if not follow the guide). Secondly, lets check that the internet is working. A great thing about using a VM is that we don’t have to fiddle with wireless (it can be a pain) as the host just provides the link as if it was wired (remember for this to work the host must be connected to the internet). Lets check by pinging google, the “-c 3” flag just says to do it three times, if you forget it just [ctl][c] to kill ping.

ping -c 3 www.google.com

If you get a path not found error, check the host connection (then check the beginners guide if that doesn’t work)! Otherwise you’ll exchange some packets with google to verify everything is working dandy.

Now we use the “lsblk” command to check the name of the disk we are going to partition, in my case its “sda” (this is important), note I can tell that because its 20Gb big (remember we set that before).

vm10

So assuming your drive is sda we’ll use fdisk to make our new partitions.

 fdisk /dev/sda 

fdisk will present us with some options. **NOTE** if at any time you want to back out just hit “q”!

vm11Here I’m setting “n” for new partition table, “p” for primary, “1” for 1st partition, then accept the default for the start sector, finally “+10G” (this is all one word, it just slipped over the screen on the screenshot) to specify that we want this first partition to take up half our drive, we could probably make this less ( “+6G”?) if you wanted more space for the home. Now the home partition. Same as before really, but this time we specify “2” for the second partition and accept the defaults for start and end sectors to take up the remainder of the drive.

vm12

Now we can preview our new partitions with “p” and if we are happy write the table “w”, note that the partitions are called “/dev/sda1” and “/dev/sda2”, make note of this for latter. I’ve got plenty of RAM so I’m not going to worry about a swap partition (-:.

vm13

Next we format our new partitions as ext4 and then create a mount point for root and then mount a home directory on the other partition (remember to change sdx depending on your information above).

#format the drives
mkfs.ext4 /dev/sda1
mkfs.ext4 /dev/sda2
#mounting!
mount /dev/sda1 /mnt
mkdir /mnt/home
mount /dev/sda2 /mnt/home

Finally lets install the base system.

pacstrap -i /mnt base base-devel

vm14Accepted the defaults and “y” to install. Take note of some of the things that are being installed here, it really is the base system (ie base programs like “which” etc, all those little bash utilities you just take for granted).

Now we organise the boot partition.

genfstab -U -p /mnt >> /mnt/etc/fstab
#now check the table
nano /mnt/etc/fstab

This is what my boot table looks like (the $ signs at the end mean that there is more text outside the screen view, if you scroll to the right you should see the numbers 1 for the “/” partition and 2 for the “/home” partition.

vm15

Now its time to setup the base system ie set locale and make the internet persistent. For this we will be entering change root, which is a special environment (read about it here). Then we will change to files that contain information on our location and character set, the guide suggest we stick to UTF-8. In my case I’m in New Zealand, so I’ll uncomment that line in the file (note you can search in nano by using [ctl][w]) set that (note we only have one time zone in NZ). You can enable multiple languages here by uncommenting them, this would be handy if you are working on a system with multiple users, or you like to curse in foreign languages!

arch-chroot /mnt /bin/bash
nano /etc/locale.gen
##in the nano editor##
#........
#en_NG ISO-8859-1
en_NV.UTF-8 UTF-8
#en_NV ISO-8859-1
#........

Save this file with [ctl][o] and [ctl][x], then run the following to generate the locale, it should report your chosen setting.

locale-gen

Now that we have enabled the language we need to set the system wide settings in a new file called /etc/locale.conf that contains our chosen default system setting. In my case the command would be below, but if you were in the USA you probably use “echo LANG=en_US.UTF-8 > /etc/locale.conf”. All we are doing is echo’ing some text to a new file. Then we just export that setting (substitute your lacale).

echo LANG=en_NZ.UTF-8 > /etc/locale.conf
export LANG=en_NZ.UTF-8

The timezone and subzone files are in a folder called “/usr/share/zoneinfo/Zone/SubZone”, with “Zone” and “SubZone” being replaced by your region. For example, if you lived in Rochester NY (eastern US time), the folder you would point to would be called “/usr/share/zoneinfo/US/Eastern”. You can see below how I use “ls” to list the directories, then I create a simlink that to “/etc/localtime” (remember you probably have regions so your directory path will be one longer (as shown for the Rochester NY example).

vm16

ln -s /usr/share/zoneinfo/NZ /etc/localtime

Now we set the clock to UTC (Coordinated Universal time).

hwclock --systohc --utc

Then set our hostname (that will be seen on a network) to whatever we like (oneword). First we create a file called “/etc/hostname” containing the name, then we use nano to edit as second file (as shown), note the “DavesArch is a [tab] from the “hostname” string on that line (the one starting with 127.0.0.1).

echo DavesArch > /etc/hostname
nano /etc/hosts
##in the nano editor!##
#
# /etc/hosts: static lookup table for host names
#

#
127.0.0.1 localhost.localdomain localhost DavesArch
::1 localhost.localdomain localhost
# End of file

We are nearly there! Lets setup the network, before configuring grub and setting a root password. For the network we will use netctl. We can copy an example file from “/etc/netctl/examples” to a new filename “/etc/netctl/my_network”; the one to use is pretty obvious since we have a virtual wired connection via our host.

cp /etc/netctl/examples/ethernet-dhcp /etc/netctl/my_network

Next we edit this file, replacing the “Interface=eth0” line shown by the “ip a” command (see below).

vm16.5

Now just use nano to edit the file we just created and replace “eth0” with our interface (in my case “enp0s3”) from the ip a output.

vm17

netctl enable my_network

We will quickly set a root password, make it hard to guess and easy to remember (ha ha).

passwd

Now to setup the grub bootloader.

pacman -S grub
grub-install --target=i386-pc --recheck /dev/sda
grub-mkconfig -o /boot/grub/grub.cfg

vm18

exit
umount /mnt/home
umount /mnt/
shutdown

We use shutdown here so that we can eject the virtual ISO before we reboot, otherwise we will be back to where we started.

vm5

This time select the ISO and click the small minus sign icon at the bottom of this window to delete the ISO drive (otherwise we will boot back into the live CD)

Once our ISO is removed we can hit the start button again on Virtualbox, and fingers crossed we’ll boot into arch!

vm20What now? Unless you are a terminal jedi we’re going to have to install some GUI tools. For me this was the most challenging part of the install especially with the added complication of working with a VM. Since we are already up to 1600 words I think I might take a break, but to get your desktop GUI up and running click here!


Setting up a Lubuntu virtual machine with virtual box [and get guest additions working]

Featured

BTW – Learn more about your linux system; Try my how-to on Arch Linux via virtualbox page

Disclaimer – this is totally safe, but please backup your computers before trying it, I take no responsibility for anything that might happen

Updated 2015 and tested – let me know if something is broken

If you haven’t tried Linux then you are really missing out. Although I run windows in a virtual machine, I’m working my way to weaning myself of that dark beast (my colleagues doing the same would certainly hasten the split).

Although I use Xubuntu on my work machine, Lubuntu is another favourite of mine due to its small footprint and minimalist approach. Both are great because they don’t have that abomination that is Unity now shipping with Ubuntu.

For a python class that I am developing I wanted to put together a how-to install Lubuntu in a virtual machine using virtual box. At work I use vmware workstation to run windows as a vm and it works pretty well. However, I had trouble using the free player, mostly due our wonderful proxy creating problems with the download and install of vmware tools (there were display problems too for some reason)! Anyway, long story short I settled on virtual box (dam you Oracle for stealing our Americas cup).

In this example I’m installing a linux vm on a windows 7 host.

(Note to self: tur-cache1.massey.ac.nz and 8080 proxy)

  1. Get virtual box from here and install it on your host system.

  2. Get the Lubuntu from here, if you can use the torrent to save the foundation some $

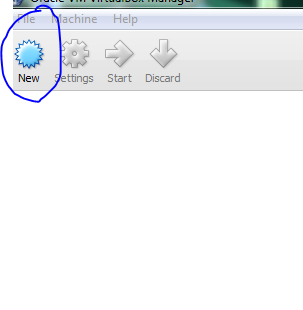
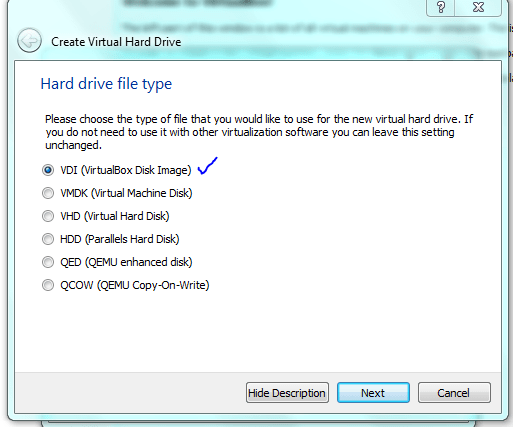
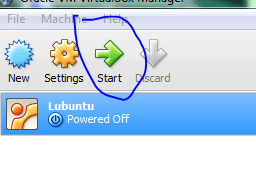
  3. Set-up your new virtual machine by starting virtual box.

Capture

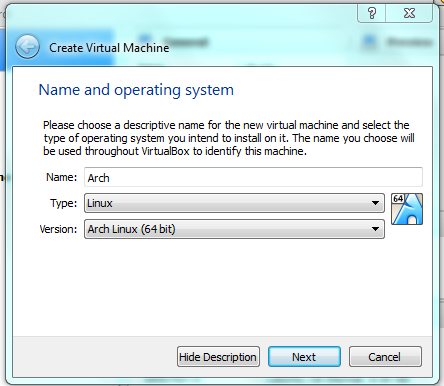
First set up the name and the OS type. The name can be anything, but best call it “lubuntu” (no quotes). Type is “linux” and the version is either ubuntu64 or ubuntu32. Click OK or Next. [Note: Most modern machines are 64 bit, use that unless you have something old so you can access more ram].

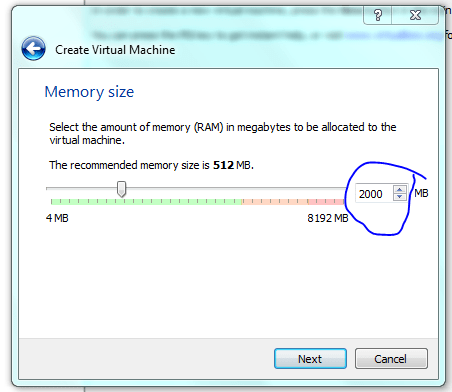
Give as much as you can, don’t forget to leave some for your host, but 2gb is a good start on my 8gb system (but in real life I might give it 3-4 gb). This can be changed latter so leave it as the default if worst comes to worst.

Capture3

Capture4

Capture5

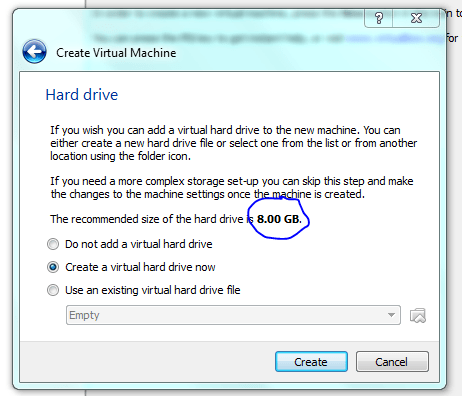
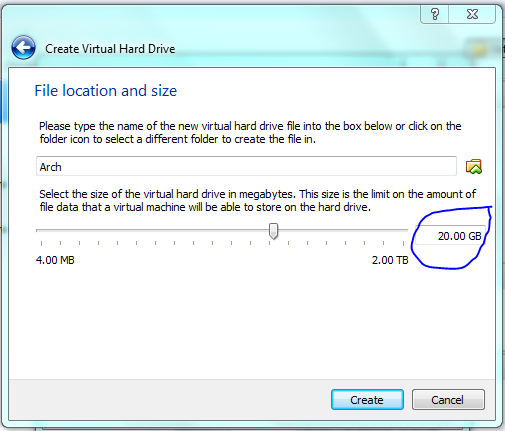
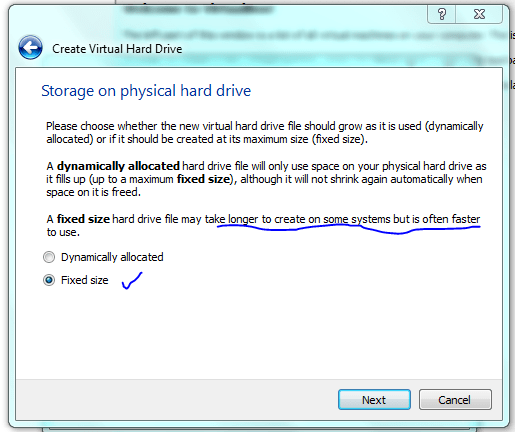
STOP! Although dynamic resizing is probably a good way to save disc space – I want speed! but for this course just use dynamic sizing ie not what I have shown below!

Capture6

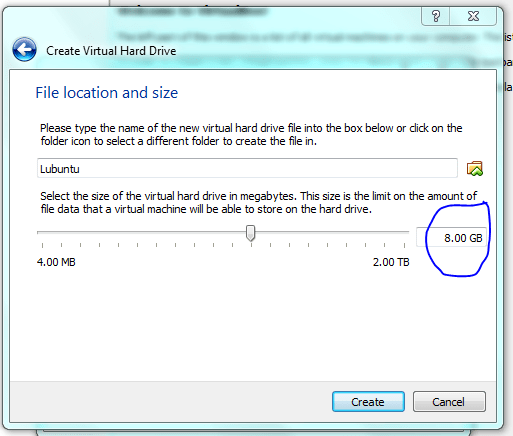
This is only a demo, normally I would make the drive considerably bigger (>20gb) to allow for software installs. But you can get away with 10 Gb as a minimum. You can share folders on your host machine once the system is up and running and this is where I would store all my important data. As an aside, I normally don’t back up my vm’s and if you do the same then, yeah, don’t store anything on the virtual machine that is important!

Capture7

Capture8

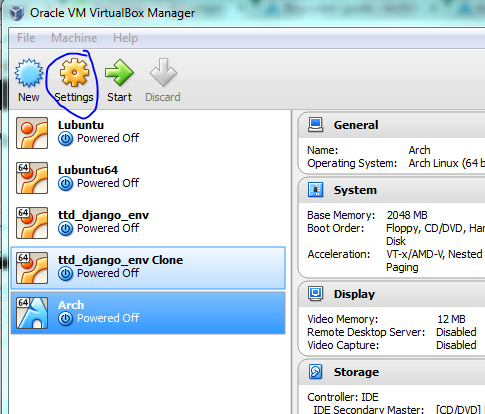
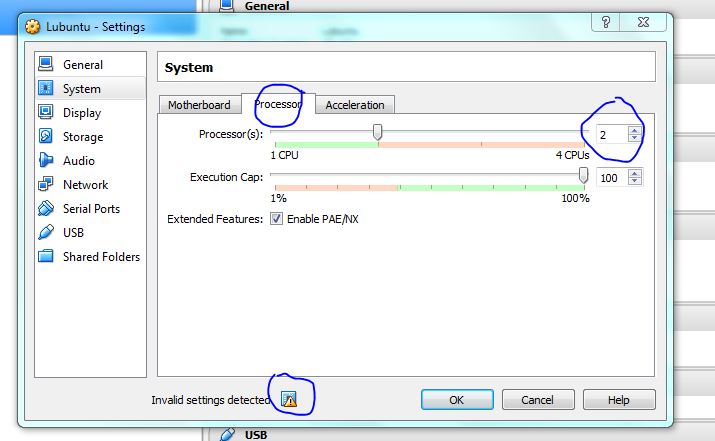
Click on the headings to access the different settings, its worth looking as the defaults are likely to make your machine run sub-optimally. OR JUST LEAVE IT FOR NOW

Capture9

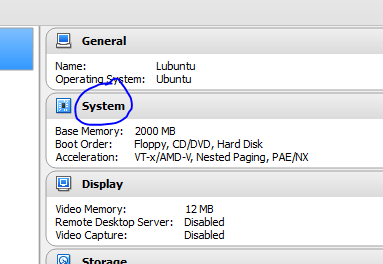
Accept the defaults if this is all too confusing!

Capture10

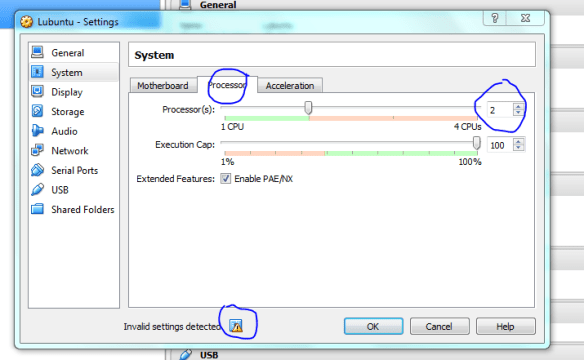
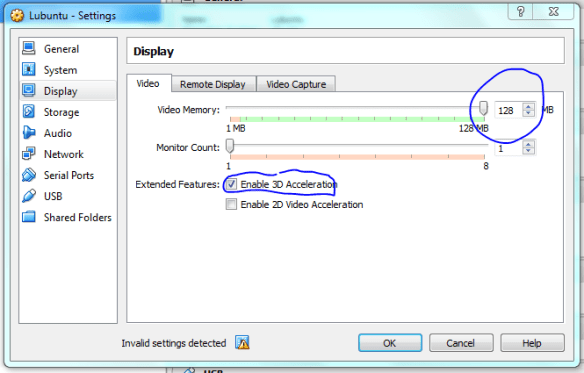
Hovering the mouse over the warning lets you know what is wrong, here it says I need to select another option if I use duel core processors, it also says it will fix it for me so I didn’t have to do anything. Display issues are a problem for me when using vms, so I’ve given a bit of RAM to the video to hopefully minimise the chance of problems. Accept the defaults if this is too confusing.

Capture11

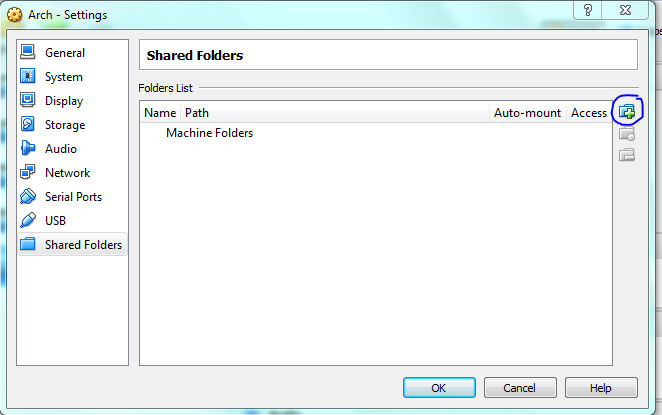
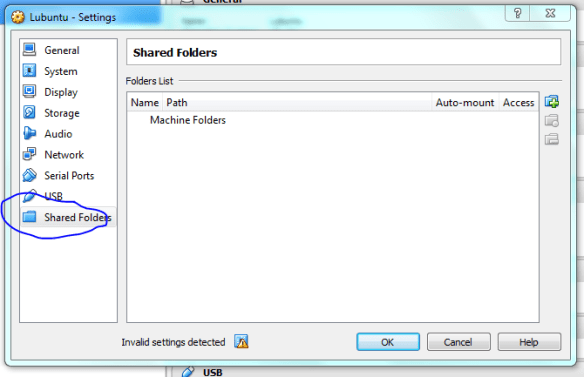
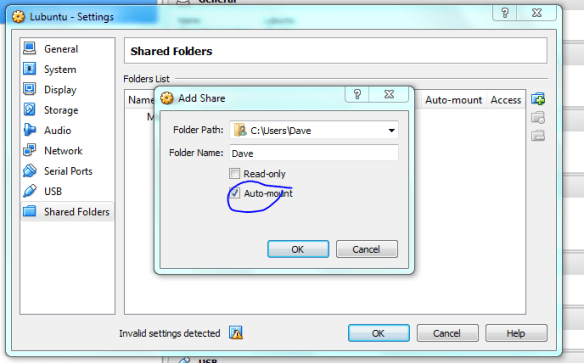
Lets set up the shared folders with the host machine now, make it mount on startup so it acts as a removable drive once the vm is running.

Capture12

Capture13

Now the machine is ready to go, but first we need to “insert” the ISO image into the virtual CD-driveClick on the “Storage” settings option and select the little disk+ icon as shown below, then when prompted navigate to the ISO using “choose disk” .

vm_cdrom

Click on the newly created drive and select “live CD” option.

livecd

With the ISO file sitting in the virtual drive its time to boot up our new computer!

Capture14

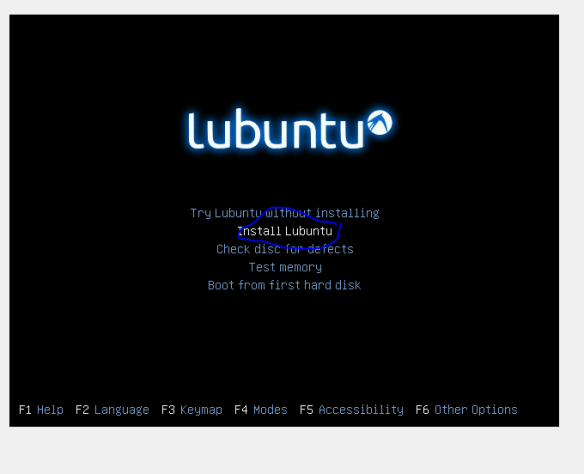
Here we have the option to try out the system first using the live CD. This does not install anything, but lets us know if we likely to run into compatibility issues. Its only a vm, so I’m just going to install.

Capture18

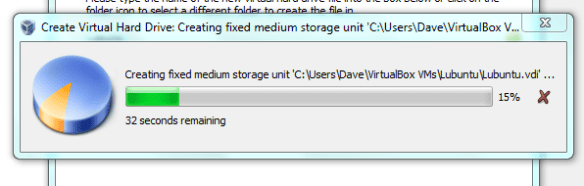
Be patient here as it might not look like it is doing anything, there even might be some error messages, sit tight and hopefully you’ll see the screen below!

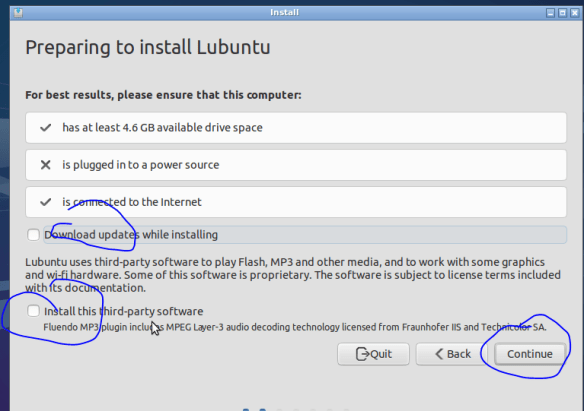
Hopefully you see the image below will load, or a new lubuntu desktop will load. If the desktop loads double click on the “install” icon on the desktop and you should see the image below (and next time follow instructions ie click the live CD option (-; ).

Capture19

Non-open codecs like mp3 etc can be installed here and you can download updates on the fly during install. These options are up to you. But if you don’t have Internet leave the “download updates while installing” boxes unchecked.

Capture20

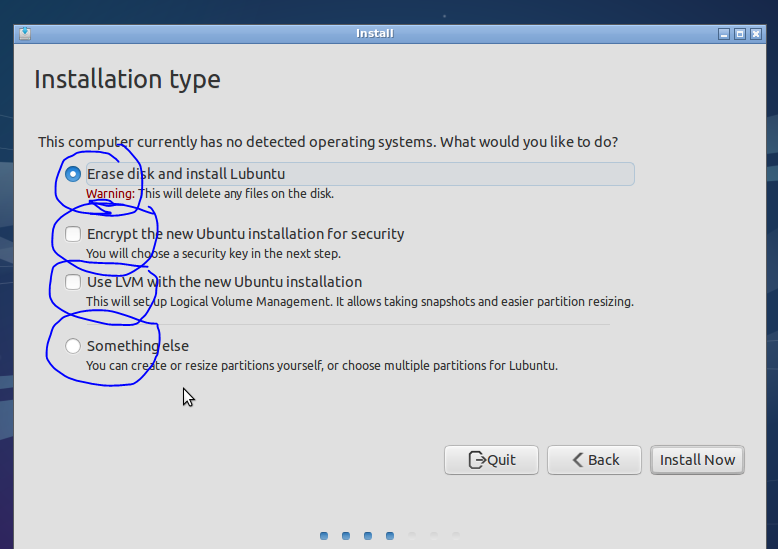
If this were a normal install (dual boot for example) I would start to sweat at this point, whilst double checking my back drives (you have one right?)! If it goes wrong here you end up with a blinking cursor, where once you had a computer full of data and software (backup backup backup). But……The great advantage of VMs is that it doesn’t really matter! If things go wrong, its only a virtual computer after all, delete it and just start again (that said: backup backup backup). Also, as you will be running the vm inside a host, there is no need to worry about the hassle of setting up a dual booting (though its not actually that hard to do). So lets go ahead and format our virtual drive.

Capture21

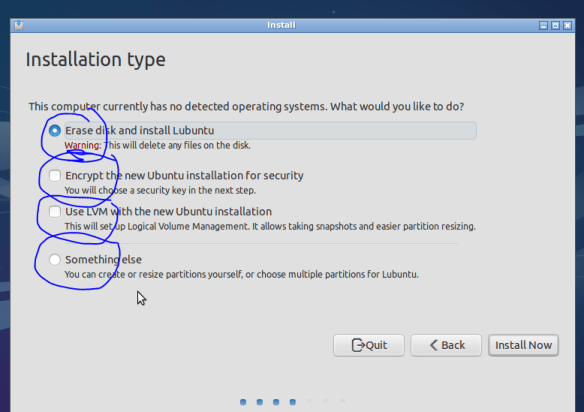
Fu*k the NSA, encrypt if you can! Click continue when asked unless you want to set up more complex swap and partition options.

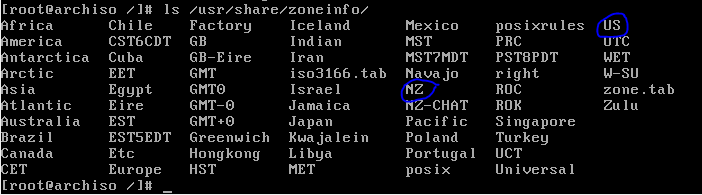
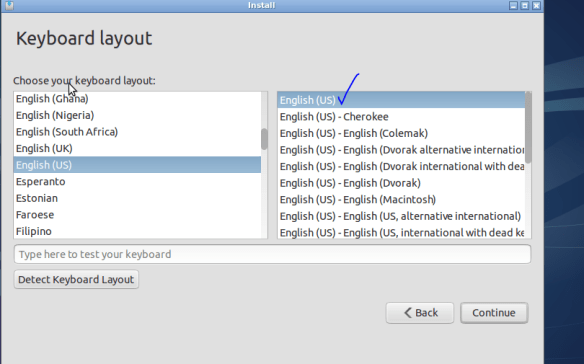
Good to see NZ just made it onto the map! Choose the US keyboard (yes this is for you know who) unless you got your computer from some strange dodgy foreign online store.

Capture22

Capture23

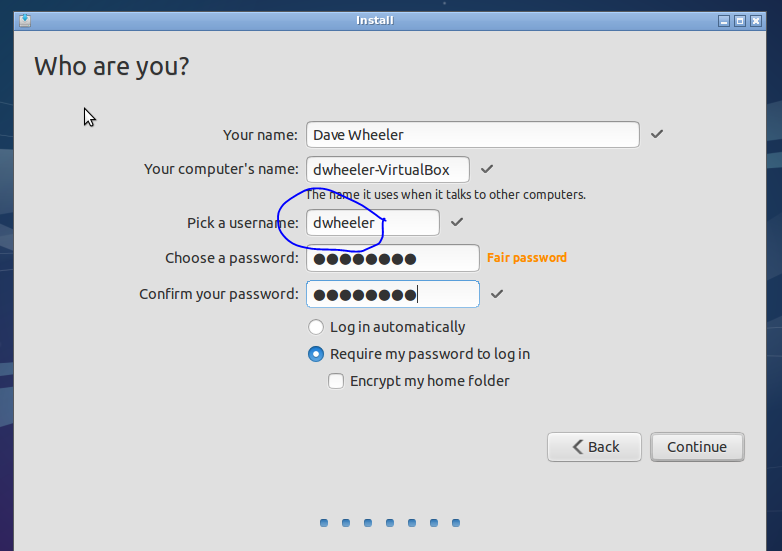
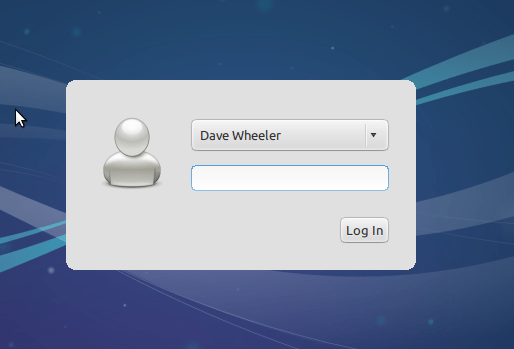
The parts the matter for you here are your username and password (no spaces in username or password). Choosing NOT to log in automatically is certainly recommended from a security standpoint.

Capture24 Capture25

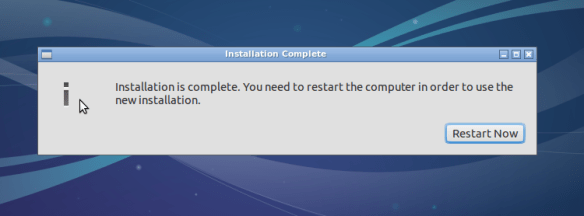
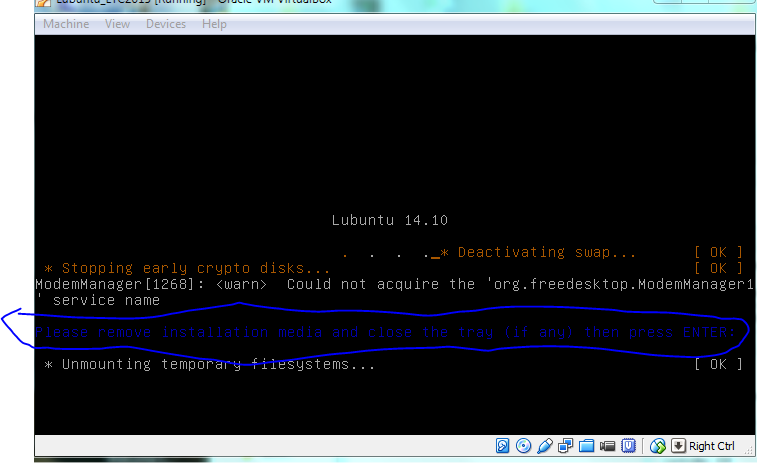
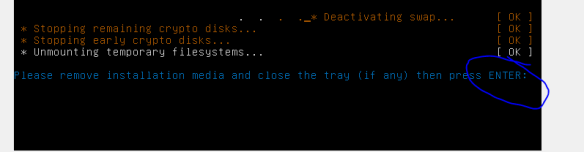
If this were a real install on a live CD you would need to eject the CD otherwise it will just boot back to the live image again (see below).

restart

we need to “eject” the Lubuntu startup/install disk from the virtual CD, otherwise the VM will just boot from that again [and thats not what we want]. So goto VB settings, storage, then right-click “remove disk from virtual drive”. Now you should be good to press enter and reboot.
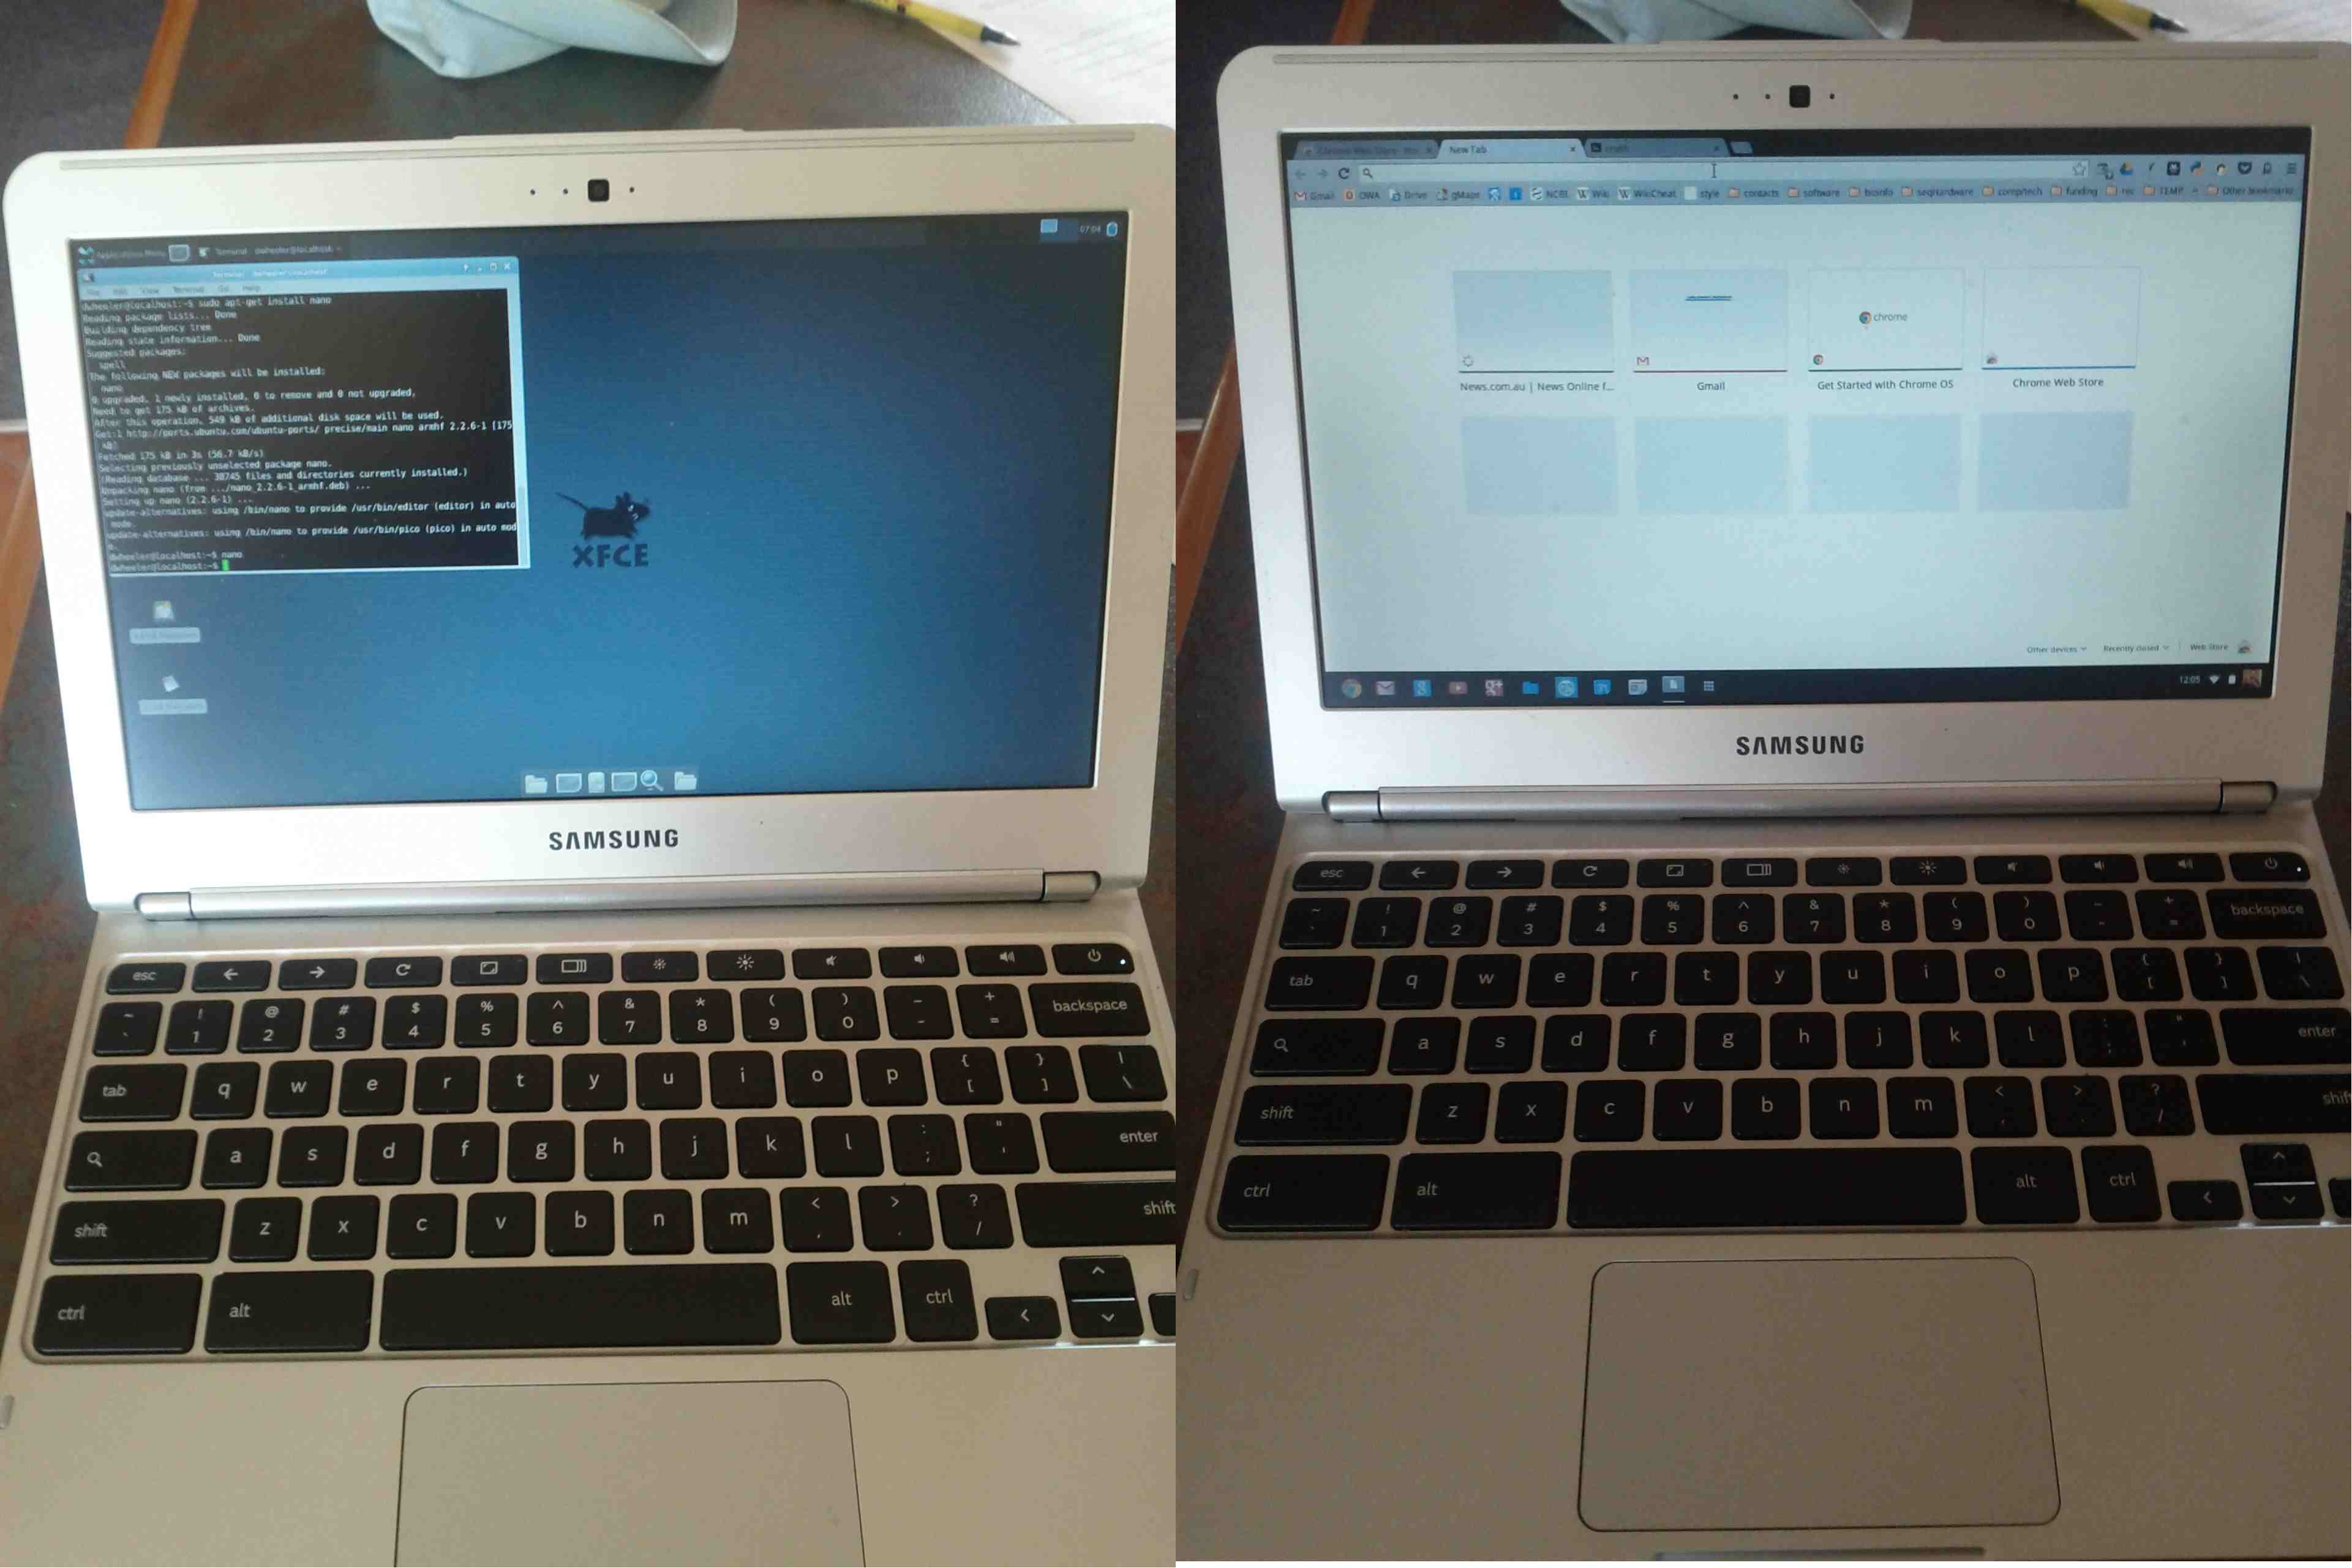
Screenshot 2015-02-20 17.41.15

Capture26

Great!

Capture27

Hopefully the display issues are minor. Next we will install guest tools that should make things run more smoothly.

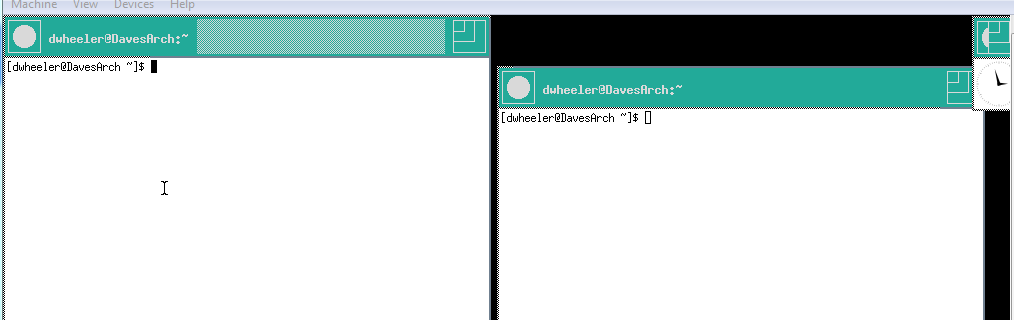
Neat Trick t: When you have your VM up and running make it full screen then use the switch desktop [ctl][alt][arrow] to change between the host and the VM. This is so much easier than minimising the VM all the time; you end up with two computers for the price of one!

Capture28

——————-SKIP THIS SECTION IF YOU ARE NOT BEHIND A PROXY—————–

Dealing with the wonderful lovely helpful joyful PROXY!

Skip this if you are not behind a proxy (nearly everyone). Open a terminal using [ctl][alt] t (the first part is just for the proxy (insert your usrname password in place of ‘password’), ignore if you are just using a normal network.)

#the fu*king proxy, ignore if you live in a normal universe 
#make a new file, copy some text into it, then send this to where apt looks for settings
echo 'Acquire::http::Proxy "http://Username:Password@tur-cache.massey.ac.nz:8080";' > ~/Desktop/99proxy
sudo cp ~/Desktop/99proxy /etc/apt/apt.conf.d 

But the fun doesn’t stop there, when you get home you have to disable this option

sudo nano /etc/apt/apt.conf.d/99proxy

#to save click [ctl][o] then [ctl][x]

When nano opens comment out ie add a # to the start of the “Acquire” line.

#Acquire::http::Proxy "http://Username:Password@tur-cache.massey.ac.nz:8080";

You have to undo this when you get back to the work proxy environment again”, for the love of the flying spaghetti monster!!!

Now to get copy paste working, full screen, shared folders, etc

We are going to install guest additions which helps copy and paste between the host and the linux system work, as well as display issues and shared folders etc. VB comes with its own package for helping with this, but the opensource community has its own version, we’ll use that. Open a terminal and type (copy and paste is unlikely to work yet) (via see (http://askubuntu.com/questions/22743/how-do-i-install-guest-additions-in-a-virtualbox-vm and https://forums.virtualbox.org/viewtopic.php?t=15679).

sudo apt-get install dkms build-essential linux-headers-generic virtualbox-guest-x11

Hit “Y” when prompted and download off the internet

Now reboot

sudo reboot

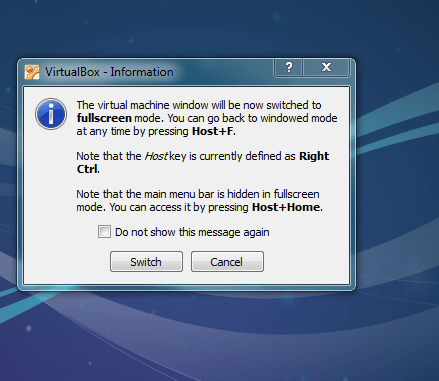
If the above worked you should be able to go to full screen mode [view][switch to full screen] — if that works yipee your done (but see optimisation steps below)!

———————————————-skip if things look OK——————————————-

If you are still having problems you can try this alt way

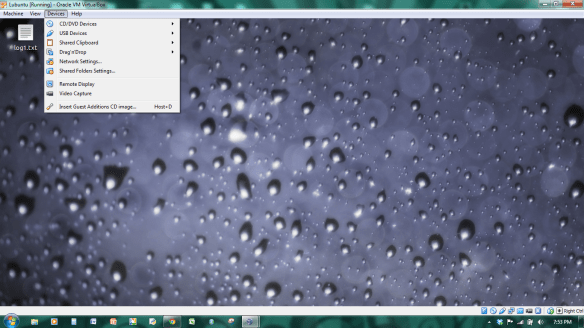
From the virtual box menu at the top or bottom of the screen (if the menu is hidden just put your mouse at the top or bottom and should appear), choose DEVICE the option “install guest addition”. (see bottom of device drop down).

Screenshot 2014-03-07 19.53.59

A box should pop up, click open or ok. If it says something like problem mounting, GOOGLE IS YOUR FRIEND, I googled this problem and this looks like a solution http://askubuntu.com/questions/80341/unable-to-mount-virtualbox-guest-additions-as-a-guest-win7-host

Now! Open a terminal window using [CTL][ALT][DEL] and type.


cd /media/[username]/VBOX*

ie if your username is ‘fred’ it will be:


cd /media/fred/VBOX*

Type “ls” and make sure you can see a file called “VBoxLinuxAdditions.run”. IF so then use sudo to install.


sudo ./VBoxLinuxAdditions.run

Now reboot and hopefully any display issues you may have are fixed! This part below is to get the Internet working for apt-get.

*************************Final optimisation*************************

Look and feel

1) USE FULL SCREEN – it drives me crazy how people leave the VM as a window, you go to click something and all of a sudden you’re back in some sucky OS like windows! Just make the screen full screen and use [right ctl][F] to graciously switch between the host and the VM.

By default the settings “options bar” are hidden (click the pin if you want to lock it in place), move the mouse to the bottom middle of the screen and they should unhide themselves. Then click “view” “switch to full screen”.

2) Move the settings bar to the top of the screen so you don’t keep accidentally bringing it up when you go to the bottom of the screen. Goto the setting bar again, click “machine” “settings” in the general section click “advanced” and “show at top of screen” (note this will only start working when you shutdown the VM, then close then reopen virtual-box)

Functionality

1) Copy and paste, options bar, “device” -“shared clip-board” – “biodirectional”, do the same with “drag and drop” also in the “device” section.

2) shared folders with host (via http://ubuntuforums.org/showthread.php?t=2083709). Open a terminal and type (replace dwheeler with your username)

sudo adduser dwheeler vboxsf

This will only work after you reboot the guest OS!

The shared folder will be in “/media/XXXX”, if you type “/media/” into the file-manager it should show up. Once you are their click “bookmarks” and add the folder for quick reference.


Last update Feb 2015

Bash for Biologists: A gateway to the terminal!

What is bash

Bash programming is a form of scripting that originates from the early days when a computer was a keyboard with a flashing cursor on a monochrome screen!

Credit: Wtshymanski @ wikipedia

Bash acts as a command line interpreter, taking input from a user (via the keyboard) and using it to make the computer to act in a certain way. Many of these commands are small scripts that do a multitude of tasks, from text processing to network communications. Although most of us now use a graphic user interface (GUI) to communicate with our computers, a basic understanding of bash programing can dramatically improve our productivity in certain situations. This is especially with dealing with the large files generated by most bioinformatic applications.

Where do I get this bash program

Well technically speaking Bash is not really a program, its more a command line interpreter and a scripting language. That said it is available by default on any NIX (Unix-like system ie ubuntu or fedora) Macintosh (OSX) and windows using a free program called cygwin (there are others as well.

Enough already!

First thing, don’t copy and paste! Why? Typing these commands is part of the hard wiring required to make them stick! Also, “with great power comes great responsibility”, and bash has the power to wipe your computer – no trash recovery – completely gone forever (except for that backup – right?)! By typing commands it gives you another opportunity to think about the command before you execute it and typing is more likely to trigger a big red flag in dangerous situations! Think twice, type once.

Ok, Ok, in the following tutorial I have attempted to provide command line solutions to some common problems faced by life scientists who have to deal with files generated by next generation sequencing technologies. I’ll probably do a few of these as with the explanations they get quite long. Of course, this is not an attempt to teach you to be a terminal master, that can only come from practice, but hopefully it will give you a taste of the power hiding behind that drab terminal exterior. It is also not designed to teach you how to program a computer, but I’m hoping this might be the gateway drug you need to get started.

The solutions in this tutorial were tested on a linux machine (Ubuntu), but should mostly work on Mac and windows through cygwin.

Problem 1. I have this huge file of DNA sequences in FASTA format (>seq1\nATGTAA) and I want to know how many sequences are in there?

Solution. This is a common problem, if your text editor manages to open the file without freezing you are still left with the problem of counting sequences. To our rescue is grep, grep is a little application that searches for strings. In our case as this is a fasta file we can search and count instances of the “>” to let us know how many sequences are in the file. And yes, this is a small file and you probably could have opened it on a 10 year old computer, but use your imagination on this one. Very important put the > in single quotes(‘>’)!!

grep ‘>’ fasta_example.fas

—————-output—————-

>fid|47273465|locus|VBIADEClo150191_2639|   >fid|47286894|locus|VBIADEClo157809_4509|   >fid|47397394|locus|VBIAERSal180824_4606|   >fid|20665099|locus|VBIAciCap40988_0842|   >fid|20666571|locus|VBIAciCap40988_1572|   >fid|20668069|locus|VBIAciCap40988_2310|   >fid|46816701|locus|VBIAciSp155132_0285|   >fid|46817921|locus|VBIAciSp155132_0889|   >fid|38082798|locus|VBIAciSp155501_0265|   >fid|38086805|locus|VBIAciSp155501_2252|   >fid|38088330|locus|VBIAciSp155501_3002|  >fid|38088628|locus|VBIAciSp155501_3149|  >fid|38090581|locus|VBIAciSp155501_4107|  >fid|85865228|locus|VBIActMas228228_1098|  >fid|101184055|locus|VBIActMas238937_2668|

So grep found all the lines with the ‘>’, but thats not exactly what we wanted. How do we count the lines. Now is a good time to introduce the manual entry (using the man command) available for all bash commands. This manual entry for grep is rather long, however it contains the information we need (highlighted in red below).

man grep

—————-output—————-

GREP(1)                                                                GREP(1)NAME

      grep, egrep, fgrep, rgrep – print lines matching a pattern

SYNOPSIS

      grep [OPTIONS] PATTERN [FILE…]

      grep [OPTIONS] [-e PATTERN | -f FILE] [FILE…]

…………….shortened for clarity…………………

  General Output Control

      -c, –count

             Suppress normal output; instead print a count of matching  lines

             for  each  input  file.  With the -v, –invert-match option (see

             below), count non-matching lines.  (-c is specified by POSIX.)

—————-end of output—————-

It looks like ‘-c’ flag (or switch) will cause grep to count the lines that match the search string rather than just print them out – perfect! Before we try it out its worth taking a second to look at another important part of the manual that specifies how to use grep. BTW you can use either -c or –count, the double minus sign just specifies the longer format of the flag that is often a little more human readable.

grep [OPTIONS] PATTERN [FILE...]

The square brackets are not used as part of the command, they merely specify that whatever is in the brackets is OPTIONAL. So the minimum command is “grep pattern”, with the possibility of adding a OPTION flag/switch and a FILE to search.This time let’s add our optional flag and repeat the search, note that the command order fits the structure described in the manual (grep ->option-> pattern ->file) .

grep -c ‘>’ fasta_example.fasta

—————-output—————-

15

Thats more like it. But reading through the manual was a little painful, we know we want to count something, so why don’t we use grep to search through the manual entry for grep, to find a line that uses the string ‘count’. Circular enough for you?To do that we need to introduce what are called pipes (“|”), they are the bar symbol on the keyboard (SHIFT backslash on my computer). First the command, then the explanation.

man grep ‘count’ | grep ‘count’

—————-output—————-

 -c, –count

             Suppress normal output; instead print a count of matching  lines

             below), count non-matching lines.  (-c is specified by POSIX.)

      -m NUM, –max-count=NUM

             –count  option  is  also  used,  grep  does  not output a count

      Large repetition counts in the {n,m} construct may cause  grep  to  use

Sweet as Bro! Pipes are a redirection, that is rather than send the output of a program to the screen (called “stdout”) or a file etc, send it to another program. In this case we redirect the output from the man program to the grep program (that the manual entry is about grep is irrelevant to your stupid computer) so that grep can look for the string “count”.

A quick aside: To ‘single quote’, “double quote”, or Not to quote, that is a good question! This will be covered a little later, but for now it is important to use single quotes whenever you want to specify a string of letter(s). We have already used one situation where this can cause problems, for example: grep > filename acts very differently to grep ‘>’ filename. As you will learn now.

Since we are talking about pipes now is a good time to talk about another type of redirection. The > symbol means redirect the output from a command to a file, which it will overwrite if it already exists (>> will append the output onto the end of the file). So

grep -c ‘>’ fasta_example1.fasta > tmp.txt

Will output nothing to the screen, rather it will put the number 15 in a file called tmp.txt. You’ll see in a moment how useful this can be when dealing with sequence files. So what do you think the grep > fasta_example1.fasta (without the single quotes around the > symbol) might do to your wonderful sequence file (Hint, it won’t end well, so if you want to try it use some throw away file)? Well time to get back to some biology!

Problem 2. I have this huge file of DNA sequences in FASTA format (>seq1\nATGTAA) and I want to split it in half (as best I can).

Solution 2. Lets combine what we have learnt with a couple of new commands to solve this problem. Firstly, lets just count the sequences to find out how many each file will have to include for the files to be split in two.

grep -c ‘>’ fasta_example1.fasta

———-output—————-

15

Well thats not an even number, so lets just put 7 in the first file and 8 in the second file. But first, two new commands, head and tail.

head fasta_example.fasta

—————-shortened output—————-

>fid|47273465|locus|VBIADEClo150191_2639| MIKISEDYIEKRFDNELLRIEAWGKNSLRIRSFVDQNFVDENYALNEKPKLNKDDITINKNEDGSAIIKNGKIKAVLDHRDRITFYNDKNEILLKEYIRLRAVKHDDGGEDVGTIEITKDFNSTLKLKSREY

tail fasta_example.fasta

—————-shortened output—————-

RSGLYEIHQRFRAYPGERIYGLGQHTHGRLDHKGLVLDLVQRNAEVSIPFYLSSRGYGFLWNNPAVGRVEFAENGTRWVADAAPGLDYWVTAGKTPAEILEHYADAVGHAPVLPEWATGFWQCKLRYLGQEELLDVAREYRRRELPLSVIVTDFFHWTAMGDYRFDPEEYPDPEAMMRELDELGVKLMVSIWPTISPLSENYDAMAEQGLLVGADQGVEFHQDIHDKKMPRSLPVAFYDP

Head by default outputs the first 10 lines of a file, whilst tail outputs the last 10 lines. You can change this default behaviour using the -n flag. Lets start by finding out what the 7th sequence is in the file.

grep ‘>’ fasta_example1.fasta | head -n 8

—————-output—————-

>fid|47273465|locus|VBIADEClo150191_2639|  >fid|47286894|locus|VBIADEClo157809_4509|   >fid|47397394|locus|VBIAERSal180824_4606|   >fid|20665099|locus|VBIAciCap40988_0842|   >fid|20666571|locus|VBIAciCap40988_1572|   >fid|20668069|locus|VBIAciCap40988_2310|  >fid|46816701|locus|VBIAciSp155132_0285|

>fid|46817921|locus|VBIAciSp155132_0889|

Normally the first part of this command just prints each line that contains the ‘>’ FASTA symbol, but here we piped the output from grep to head, using the -n flag to show only the first 8 lines. So what? Well remember that you file might have 1000s of sequences, finding out which one is the 501’st might be a little more tricky if you lived in a world without grep, head and tail. So now we know that “>fid|46817921|locus|VBIAciSp155132_0889|” is the first sequence that needs to go in our second file. Now once again after looking at the manual page for grep we see that the -n flag reports the line number of the pattern match.

grep -n ‘>fid|46817921|locus|VBIAciSp155132_0889|’ fasta_example1.fasta

—————-output—————-

102:>fid|46817921|locus|VBIAciSp155132_0889|

There are multiple ways of doing this. We could use another command wc -l filename which counts the number of lines in a file, then subtract 102 from this number and feed that to tail, basically to print out the last x lines. However, rather than introducing a new command (too late) lets look at the man page for tail and see if we can do what we want that way.

man tail

—————-output shortened—————-

-n, –lines=K

             output the last K lines, instead of the last 10; or use -n +K to

             output lines starting with the Kth

Great, so all we need to do is pass the line number we want tail to start from with the switch -n and the “+” symbol. Putting this all together.

head -n 101 fasta_example1.fasta > first_half.fasta
tail -n +102 fasta_example1.fasta > second_hald.fasta
grep '>' first_half.fasta

Lets quickly check to see if it worked.

>fid|47273465|locus|VBIADEClo150191_2639|  >fid|47286894|locus|VBIADEClo157809_4509|   >fid|47397394|locus|VBIAERSal180824_4606|   >fid|20665099|locus|VBIAciCap40988_0842|   >fid|20666571|locus|VBIAciCap40988_1572|   >fid|20668069|locus|VBIAciCap40988_2310|   >fid|46816701|locus|VBIAciSp155132_0285|

grep ‘>’ second_half.fasta

>fid|46817921|locus|VBIAciSp155132_0889|   >fid|38082798|locus|VBIAciSp155501_0265|   >fid|38086805|locus|VBIAciSp155501_2252|   >fid|38088330|locus|VBIAciSp155501_3002|  >fid|38088628|locus|VBIAciSp155501_3149|  >fid|38090581|locus|VBIAciSp155501_4107|  >fid|85865228|locus|VBIActMas228228_1098|  >fid|101184055|locus|VBIActMas238937_2668|

Perfect! 7 sequences in the first file, 8 in the second. As I said previously this will work just as well with 100000000 sequences as it did in this small example!

Developer mode and Ubuntu on a chromebook without duel booting

I really love my chromebook, at least when I get to wrestle it off the wife. But every now and then I miss the fact that I can’t jump into the terminal and start tapping away. But I don’t really want to get rid of chomeOS, its great the way it is and duel booting seems to defeat the purpose of having a quick start “always on” laptop.

So long story short, I wasn’t ready to go down the install ubuntu on your chromebook path. That was until I came across a great post on google+ (https://plus.google.com/u/0/112449749826562830126/posts/ZS9WaegrZYH) which describes a bunch of scripts called crouton that allow you to run ubuntu inside of chromeOS! Switching between the two systems is as easy as a key stroke, and it is instant.

Instructions for ARM based Samsung chromebooks (the $250 ones)

1. Backup everything! Well if you live in the cloud this is not a problem as google is taking care of this for you, but this process WIPE YOUR DRIVE (You can restore chromeOS if you like, no harm no foul, but any data on your SSD will be GONE).

Also, developer mode is less secure as Google is no longer watching your back, don’t be stupid with your new found power!

Identity crisis, Linux and ChromeOS side by side!

Identity crisis, Linux and ChromeOS side by side!

1. Power off and enter developer mode by tapping the power button while holding down ESC and REFRESH, this should bring up a scary “your OS is damaged” screen, now hit CTRL D, and following the on screen instructions press ENTER to switch to developer mode (this takes some time).

2. Once you are back to the login screen, type in your google credentials and restore you system, for me it seemed that everything was running a lot quicker than with the walled garden version, maybe I was dreaming.

3. Once you are up and running with your ChromeOS, open a browser and download crouton, use the file manager to check that it has downloaded to your download directory.

4. Now open a shell window by typing CTL ALT T (note, this won’t work if you use the VT2 terminal ie CTL ALT Forward!), at the chronos shell type “shell” to, well, enter the shell

5. Follow the instructions to setup a sudo password!

6. Now: “sudo sh -e ~/Downloads/crouton -t xfce”. Note this will install xfce desktop (a light weight desktop that comes with xubuntu, really, its all you need), see the crouton page for more information on other options (Unity, if your that way inclined\-:).

8. After the system downloads and installs, at the prompt type “sudo startxfce4” to enter your new linux environment!

So far this is great, to switch between stock chromeOS and xfce just use Ctrl+Alt+Shift+Back and Ctrl+Alt+Shift+Forward, how easy is that!

So what now, well apt-get works, why not install nano, or in my case gimp, since I needed to edit some of the photos in this post. Life is good(-:

Screenshot - 030213 - 19:22:01

Issues: yes! There is a little bit of instability, but I’ve found a quick switch between OS’s seems to calm things down.